文件索引:
IOT嵌入式系統作業(PDF下載):
作業1: C++ 作業 [展開目錄] ※需使用PC Windows 瀏覽器 下載 PDF 檔案。
IOT嵌入式系統作業(影片撥放):
VIDEO 作業2:Arduino作業 - 使得三顆 LED 輪流閃爍。
VIDEO 作業3:Arduino作業 - 使得三顆 LED 一起呼吸。
VIDEO 作業4:Arduino作業 - 使得三顆 LED 輪流呼吸。
VIDEO 作業5:Arduino作業 - 使用ESP32實現蜂鳴器播放音樂。
VIDEO 作業6:Arduino作業 - 實作簡易的門窗警報裝置。
VIDEO 作業7:Arduino作業 - 實作計數器,按一次按鈕,計數器加1,計算按鈕次數。
VIDEO 作業8:Arduino作業 - 每按一次按鈕,計數器加1並顯示於Monitor,同時計數器
VIDEO 作業9:Arduino作業 - 實作轉動可變電阻,控制LED亮度。
VIDEO 作業10:實作轉動可變電阻,可變蜂鳴器音調。
VIDEO 作業11:實作WeMos D1 R32與WiFi 路由器/分享器 連線。
VIDEO 作業12:實現 WeMos D1 R32與 Linux 主機通訊。
VIDEO 作業13:實現 WeMos D1 R32 使用Line Notify 傳送訊息給 LINE。
VIDEO 作業14:實現基於發送訊息到LINE的門窗警報系統。
VIDEO 作業15:倉庫溫度異常發送訊息到LINE。
VIDEO 作業16:使用 Python 或 PHP 發送 LINE訊息。
VIDEO 作業17:實現使用LCD顯示當下的溫度與濕度。
VIDEO 作業18:實現ESP32傳送DHT-11溫濕度到Thingspeak。
VIDEO 作業19:使用瀏覽器透過Arduino Web Server控制兩個LED。
VIDEO 作業20:使用 HTML(using POST) + PHP 透過Arduino Web Server控制兩個LED。
VIDEO 題目:期末專題:分散式PORTLOG架構,使用Iot當作節點硬體。
IOT嵌入式系統練習題(WORD下載):
IOT嵌入式系統學習日誌:
2023/1/4 - 嵌入式 Web Server 允許跨網域存取
server.enableCORS(true);
2022/12/28 - C++ Lamdba 匿名功能宣告
#include<iostream>
int main() {
[](){
cout << "Lamdba" << endl;
}();
}
2022/12/27 - 使用JSON套件
安裝ArduinoJson套件:
至”工具”>>”管理程式庫”
搜尋 ArduinoJson
作者為 Benoit Blanchon
原始碼:
//醬是創客 開發實作的好夥伴
#include "WiFi.h "#include <ArduinoJson.h> StaticJsonDocument<200> json_doc; DeserializationError json_error;
Serial.begin(115200);//字串轉JSON
json_doc["room"] = "chosemaker ";www.chosemaker.com ";serializeJson(json_doc, json_output); string to json: " );
//JSON轉字串
json_error = deserializeJson(json_doc, json_output);
payload_room = json_doc["room "];msg "];json to string: " ); payload_room: " ); payload_msg: " );
}
}
輸出:
string to json:
2022/12/24 - 使用SD CARD 讀卡機
接線圖(ESP32)
讀卡機 <-> ESP32
VCC<-> 5V
外掛元件:
1. SdFat
2. SdFat - Adafruit
原始碼:
#include "FS.h "SD.h "SPI.h "
void readFile(fs::FS &fs, const char * path){
Serial.printf("Reading file: %s\n ", path);
File file = fs.open(path);
Serial.println("Failed to open file for reading ");
}
Serial.print("Read from file: ");file.available() ){
Serial.write(file.read() );
}
}
void setup(){
Serial.begin(115200);!SD.begin() ){
Serial.println("Card Mount Failed ");
}
//readFile(SD, "/setting.ini");
}
void loop(){
readFile(SD, "/setting.ini ");
}
2022/12/23 - 溫度計、LCD與雲端資料庫結合
#include <Wire.h> #include <LiquidCrystal_I2C.h> #include "DHTesp.h" #include <WiFi.h> <HTTPClient.h> <WiFiClientSecure.h>
//Wifi 資訊
const char* ssid = "hDDnyHiafAFmT hDDnyHiafAFmT
//宣告
String url, str;
//定義訊號要從GPIO4 進來
DHTesp dht;
// 設定 LCD I2C 位址
LiquidCrystal_I2C lcd(0x27,16,2); // set the LCD address
void setup(){
//預設值
url="https://api.thingspeak.com/update?api_key=hDDnyHiafAFmT ";
//連接WIFI
delay(10);
Serial.print("Connecting to ");
delay(500);
}WiFi connected ");IP address: ");
//溫度感測器
Serial.println("Humidity and temperature\n ");dht.setup(dhtPin, DHTesp::DHT11);
//LCD顯示器
lcd.init();
//顯示開發者資訊
Serial.println("------------ Developer -------------- "); Info: 1711131010, 胡仁豪 "); ------- Monitoring parameters ------- ");
}
void loop(){
//取得溫度
float h = dht.getHumidity();
//顯示到SERIAL
Serial.print("Humidity = ");%\t ");Temperature = ");C ");
//顯示到LCD
lcd.clear();% ");// 溫度符號(degree symbol) C ");
//上傳到API網站
String url1 = url + "&field1= " + (int)t + "&field2= " + (int)h; Return: " + str); //API 網站回傳值
//延遲五秒
//delay(1500);
}
String doGet(String url) {
HTTPClient http; //Declare an object of class HTTPClient //Check WiFi connection status
http.begin(url);//Send the request
payload = http.getString(); //Get the request response payload
}//Close connection
}
}
2022/12/21 - LCD 練習使用
#include <Wire.h> <LiquidCrystal_I2C.h>
// 設定 LCD I2C 位址
LiquidCrystal_I2C lcd(0x27,16,2); // set the LCD address
void setup(){
pinMode(LED_BUILTIN, OUTPUT);lcd.init();
lcd.backlight();
lcd.setCursor(0,0);hello world! ");
lcd.setCursor(0,1);5171 ");
}
void loop(){
digitalWrite(LED_BUILTIN, HIGH);
}
2022/12/21 - HTTPClient 練習使用
#include <WiFi.h> <HTTPClient.h> <WiFiClientSecure.h> const char* ssid = "hDDnyHiafAFmT ";hDDnyHiafAFmT ";
void setup() {
pinMode(LED_BUILTIN,OUTPUT);Connecting to ");WiFi.mode(WIFI_STA);
delay(500);. ");
}WiFi connected ");IP address: ");url="https://wisdom.nutc.edu.tw/~1711031011/hello.php?name=xxxxxxxxx ";
}
void loop() {
digitalWrite(LED_BUILTIN, HIGH);
}
String doGet(String url) {
HTTPClient http; //Declare an object of class HTTPClient //Check WiFi connection status
http.begin(url);//Send the request
payload = http.getString(); //Get the request response payload
} //Close connection
}
}
2022/12/14 - 倉庫溫度異常機器人
#include <WiFi.h>
//請修改以下參數--------------------------------------------
char SSID[] = "hDDnyHiafAFmT hDDnyHTafAFmT hDDnyHTTn7yjeaaeLDHhufTj7hFed7GeneiafAFmT
//---------------------------------------------------------
SimpleDHT11 dht11(pinDHT11);//DHT11物件
void setup() {
Serial.begin(115200);
//連線到指定的WiFi SSID
Serial.print("Connecting Wifi: ");
while (WiFi.status() != WL_CONNECTED) {
Serial.print(".");
}
//連線成功,顯示取得的IP
Serial.println("");
}
void loop() {
//嘗試讀取溫濕度內容
byte temperature = 0;
if ((err = dht11.read(&temperature, &humidity, NULL)) != SimpleDHTErrSuccess) {
Serial.print("Read DHT11 failed, err="); Serial.println(err); delay(1000);
}
Serial.print("Sample OK: ");
//設定觸發LINE訊息條件為溫度超過30或濕度超過80
if ((int)temperature >= 30 || (int)humidity >= 80) {
//組成Line訊息內容
String message = "檢測環境發生異常,請協助儘速派人查看處理,目前環境狀態:";
if (client.connect(host, 443)) {
int LEN = message.length();
String url = "/api/notify";
//權杖
client.print("Authorization: Bearer "); client.println(Linetoken);
//等候回應
delay(2000);
//顯示傳遞結果
Serial.println(response);
}
else {
//傳送失敗
Serial.println("connected fail");
}
}
delay(5000);
}
2022/12/14 - 讀取溫濕度計數值
先安裝Lin:DHT sensor library for ESPx
#include "DHTesp.h"
DHTesp dht;
void setup(){
Serial.begin(115200);
}
void loop(){
float h = dht.getHumidity();
}
2022/12/14 - PHP - Line Noity
<?php
function lineNotifyMessage($message,$token){
$headers = array(
"Content-Type: multipart/form-data",
);
$message = array(
"message" => $message
);
$ch = curl_init();
curl_setopt($ch, CURLOPT_POST, true);
}
$token="hDDnyHTTn7yjeaaeLDHhufTj7hFed7GeneiafAFmT
?>
2022/12/14 - Python - Line Noity
先安裝套件:pip3 install requests
import requests
def lineNotifyMessage(token, msg):
headers = {
"Authorization": "Bearer " + token,
}
payload = {'message': msg }
if __name__ == "__main__":
token = 'hDDnyHTTn7yjeaaeLDHhufTj7hFed7GeneiafAFmT
2022/12/14 - Python - 安裝、安裝套件
安裝版本:Python 版本 v3.9
安裝套件指令:
pip3 list
pip3 install
安裝套件指令:pip3 install requests
2022/12/7 - 練習使用LINE Noity
#include <WiFi.h> //這裡是ESP8266 WIFI函式庫,如果是要用ESP32,要記得修正為WiFi.h#include <TridentTD_LineNotify.h>hDDnyHTTn7yjeaaeLDHhufTj7hFed7GeneiafAFmT "
// Set WiFi credentials
#define WIFI_SSID "HawlIPhone8"efHH7tGGMhFjfybEdFy4b3RtMbM74jD8hGnTMbu3u "
WiFiClient client; //網路連線物件
void setup(){
Serial.begin(115200); // 設定速率
WiFi.mode(WIFI_STA);
//等待無線網路連接
while (WiFi.status() != WL_CONNECTED)
{
delay(100);
}
LINE.setToken(LINE_TOKEN); //設定Line Token權杖
LINE.notify("\n學號:1711131010\n姓名:胡仁豪"); //發送訊息到Line上面
}
void loop() {
2022/12/7 - 練習讀取串列來的字串資料
void setup(){
Serial.begin(115200);
}
void loop(){
if( Serial.available() ){
int x = Serial.read();
if(x=='a'){
Serial.println("red");
}
if(x=='b'){
Serial.println("not red");
}
}
}
2022/11/30 - 連接WIFI簡易函式(函式庫)
connectToWifi.h
void connectToWifi(const char* ssid, const char* password){
Serial.println();
while (WiFi.status() != WL_CONNECTED) {
delay(500);
}
Serial.println("");
}
2022/11/2 - 使用 millis() 功能,控制兩個 LED
// each "event" (LED) gets their own tracking variable
unsigned long previousMillisLED12=0;
// different intervals for each LED
int intervalLED12 = 500;
// each LED gets a state varaible
boolean LED13state = false; // the LED will turn ON in the first iteration of loop()
void setup() {
pinMode(13, OUTPUT);
}
void loop() {
// get current time stamp
// only need one for both if-statements
unsigned long currentMillis = millis();
// time to toggle LED on Pin 12?
if ((unsigned long)(currentMillis - previousMillisLED12) >= intervalLED12) {
LED12state = !LED12state;
digitalWrite(12, LED12state);
}
// time to toggle LED on Pin 13?
if ((unsigned long)(currentMillis - previousMillisLED13) >= intervalLED13) {
LED13state = !LED13state;
digitalWrite(13, LED13state);
}
}
2022/11/2 - 使用 millis() 功能,顯示時間
unsigned long t;
void setup(){
Serial.begin(115200);
}
void loop(){
Serial.print("Time: ");
t= millis();
Serial.println(t);
delay(1000);
}
2022/11/2 - 使用 PULLUP 功能,控制 LED 亮度
void setup(){
Serial.begin(115200);
pinMode(12, INPUT_PULLUP);
}
void loop(){
int Port12 = digitalRead(12);
Serial.println("Port 12 OFF");
}else{
Serial.println("Port 12 ON");
}
}
2022/11/2 - 測試 Gpio Port 有無 PULLUP 功能
void setup(){
Serial.begin(115200);
pinMode(12, INPUT_PULLUP);
}
void loop(){
int Port12 = digitalRead(12);
Serial.println("Port 12 pulsed");
}
int Port13 = digitalRead(13);
Serial.println("Port 13 pulsed");
}
int Port14 = digitalRead(14);
Serial.println("Port 14 pulsed");
}
int Port16 = digitalRead(16);
Serial.println("Port 16 pulsed");
}
int Port17 = digitalRead(17);
Serial.println("Port 17 pulsed");
}
delay(100);
}
2022/10/26 - 開關控制偵測 LED
void setup() {
// put your setup code here, to run once:
Serial.begin(115200);
}
void loop() {
// put your main code here, to run repeatedly:
Serial.println(digitalRead(12));
}
2022/10/26 - 開關控制偵測
void setup() {
// put your setup code here, to run once:
Serial.begin(115200);
}
void loop() {
// put your main code here, to run repeatedly:
Serial.println(digitalRead(12));
}
2022/10/26 - Delay() 的另一個做法
millis() 函式,取得開機後到現在之總時間 (單位 1 / 1000 秒)。
2022/10/19 - Tone 小蜜蜂範例
#include <Tone32.h>
int buzzer = 12;
void setup() {
Serial.begin(115200);
}
void loop() {
for(int i = 0 ; i < 49 ; i++){
tone(buzzer, freq[melody[i]-1],beat[i]*250,0);
}
}
2022/10/19 - Tone 範例
#include <Tone32.h>
int buzzerPin=12; //D9 conectted to a buzzer
void setup() {
pinMode(buzzerPin, OUTPUT);
}
void loop() {
alarmBeep(buzzerPin);
}
void alarmBeep(int pin) {
tone(pin, 1000, 1000, 0);
}
2022/10/19 - DAC 範例
#define DAC1 25
int brightness = 0;
void setup() {
Serial.begin(115200);
}
void loop() {
Serial.println(brightness);
brightness = brightness + brightStep;
brightStep = -brightStep;
}
}
2022/10/12 - 電子學
三用電錶的功能:
測量電壓、電流、電阻。
電阻器的二大作用:限流和降壓 [Link ]
有關電阻器的知識,在電路中電阻器主要有二大作用,一是限流,二是降壓。
從歐姆定律I=U/R可知,當電壓U一定時,流過電阻器的電流I與其阻值R成反比 。由於限流電阻R的存在,將發光二極體VD的電流限制在10mA。
當電流流過電阻器時,必然會在電阻器上產生一定的壓降,壓降大小與電阻值R及電流I的乘積成正比,即:U=IR 。
利用電阻器的降壓作用,可以使較高的電源電壓適應元器件工作電壓的要求。
色環電阻的讀值與方向識別 [Link ]
色環電阻的方向識別
色環電阻應用廣泛,無論怎樣安裝,維修者都能通過色環讀出其阻值,便於檢測與更換。但是實踐中發現,色環電阻的排列方向不分明,尤其是體積較小的色環電阻,容易讀錯。在方向識別上,可用如下方法:方法1:找出誤差環
誤差環是末尾環(最右邊的色環),找到它便可確定方向。常用的誤差環色:金、銀、棕。特別是金、銀,絕少用於第一環(最左邊的色環),所以只要有金、銀環,就基本認定末尾環的位置。
方法2:確定棕色環是否為誤差環
棕色環既可為誤差環也可為數字環,並且可能同時出現在首尾環,此時可藉助色環之間的間隔判斷,通常誤差環(末尾環)與其他色環之間的間隔要遠一些。
方法3:讀值是否為標稱阻值
僅靠色環間距無法判定方向,可嘗試讀值,與標稱阻值進行對比,與標稱值不相符的為錯誤方向。
方法4:通過測量或周圍電路預估阻值
如果遇到色序:棕、黑、黑、棕、棕,其值為:100×10Ω=1KΩ誤差為1%,屬於正常標稱值,若反色序:棕、棕、黑、黑、棕,其值為110×1Ω=110Ω,誤差為1%,也屬於正常標稱值。但阻值相差10倍,此時需要通過測量或周邊電路來預估阻值範圍後,才能確定方向。
電阻色碼計算器
https://www.mouser.tw/technical-resources/conversion-calculators/resistor-color-code-calculator
頻率與週期 [Link ]
頻率的定義
每秒完成周期性變化的次數叫做頻率,常用f表示。
週期的定義:每週所需的時間,常用T表示,單位是秒。1ms=10-3 s; 1μs=10-6 s; 1ns=10-9 s 。
頻率的單位
物理中頻率的基本單位是赫茲(Hz),簡稱赫,也常用千赫(kHz)或兆赫(MHz)或吉赫(GHz)做單位。1kHz=103 Hz,1MHz=106 Hz,1GHz=109 MHz。
日常生活中的交流電的頻率一般為50Hz或60Hz,而無線電技術中涉及的交流電頻率一般較大,達到千赫茲(KHz)甚至兆赫茲(MHz)的度量。
【公式】f=1/T
2022/10/12 - PWM(DAC) 教學
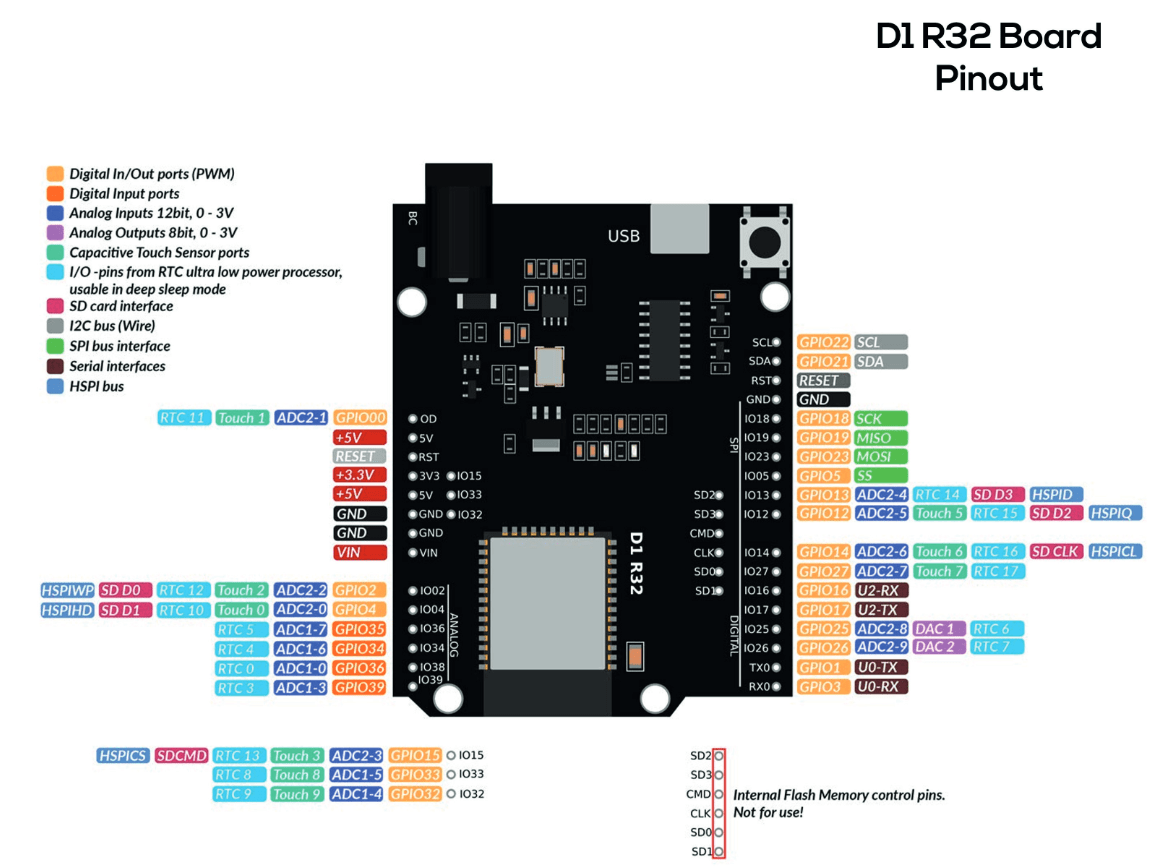
1. WEMOS D1 R32 GPIO配置圖 [參閱 ]
2.PWM GPIO
PIN(LED):25, 26
3.相關函式:
#include <analogWrite.h> [下載 ]
pinMode(led, OUTPUT);
analogWrite(led, brightness,255);
2022/10/5 - Linux 常用指令
ps : 執行中的程式
ifconfig 、ip addr : 看IP
mv : 搬移檔案
rm : 刪除
touch : 建立空白檔案、更改檔案/ 目錄日期
cat : 檢視檔案
$HOME: 主目錄環境變數
ps -ef :看執行中的程式
logout / exit / ctrl + d :登出功能
more / less :檢視檔案
2022/9/28 - Arduino 設定
1. 開 ARDUINO軟體,檔案 -> 偏好設定:在下方額外的開發板管理員網址:
輸入:
https://dl.espressif.com/dl/package_esp32_index.json
2. 重啟應用程式
3. 選擇型號 TOOLS\ Board \ WEMOS LOLIN32
3. 設定 COM Port 速度 115,200
4. 設定正確 COM Port (例如 COM3)
2022/9/28 - Linux 常用指令
clear : 清除畫面
who :顯示線上使用者
pwd : 顯示目前目錄
man ls :顯示操作手冊
ls -l :顯示檔案清單
cd : 切換目錄,後面不家參數,等於回到<<家目錄>>
cat :檢視文件
nano :編輯文件
cp :複製檔案
2022/9/22 - C++作業 - 輸入數字,對應等級 A~E
using namespace std ;
int main () {
int c ;
cout << "Input 0~100: " ;
cin >> c ;
switch ( c ) {
case 0 ... 59 :
cout << "E Level" << endl ;
break ;
case 60 ... 69 :
cout << "D Level" << endl ;
break ;
case 70 ... 79 :
cout << "C Level" << endl ;
break ;
case 80 ... 89 :
cout << "B Level" << endl ;
break ;
case 90 ... 100 :
cout << "A Level" << endl ;
break ;
default :
cout << "? Level" << endl ;
break ;
}
return 0 ;
}
2022/9/22 - C++作業 - 輸入數字,顯示對應的星期英文
#include <iostream>
#include <string>
#include <vector>
using namespace std ;
using std :: cout ; using std :: cin ;
using std :: endl ; using std :: string ;
using std :: vector ;
int main () {
int c ;
vector < string > str_arr1 = { "Sunday" , "Monday" , "Tuesday" , "Wednesday" , "Thursday" , "Friday" , "Saturday" };
cout << "Input 0~6: " ;
cin >> c ;
cout << str_arr1 [ c ] << endl ;
return 0 ;
}
2022/9/21 - C/ C++輸入文字練習
#include <stdio.h>
int main ( void ) {
float a , b ;
printf ( "Input a,b: " );
scanf ( " %f , %f " ,& a ,& b );
if ( a >= b )
printf ( " %f \n " , a );
else
printf ( " %f \n " , b );
return 0 ;
}
#include <stdio.h>
int main ( void ) {
float a , b ;
printf ( "Input a,b: " );
scanf ( " %f , %f " ,& a ,& b );
if ( a >= b )
printf ( " %f \n " , a );
else
printf ( " %f \n " , b );
return 0 ;
}
2022/9/21 - C/ C++語言的字串宣告
#include <stdio.h>
int main ( void ) {
const char * str = "Hello \n " ;
char str2 [] = "Hello2 \n " ;
printf ( " %s , %s " , str , str2 );
return 0 ;
}
#include <iostream>
using namespace std ;
int main () {
string str = "test1" ;
str = str + ",test2" ;
cout << str << endl ;
return 0 ;
}
2022/9/21 - 使C語言支援BOOL型別
#include <stdio.h>
#include <stdlib.h>
#include <stdbool.h> //放入這行使其支援 BOOL 型別
int main ( void ) {
bool keep_going = true ; // Could also be `bool keep_going = 1;`
bool x = true ; /* equivalent to bool x = 1; */
bool y = false ; /* equivalent to bool y = 0; */
while ( keep_going ) {
printf ( "This will run as long as keep_going is true. \n " );
keep_going = false ; // Could also be `keep_going = 0;`
}
printf ( "Stopping! \n " );
if ( x ){
puts ( "This will print!" );
}
if (! y ){
puts ( "This will also print!" );
}
return EXIT_SUCCESS ;
}
2022/9/21 - 自訂函式庫練習
【header_test.h】
char ch [] = "Hi" ;
namespace ns_test1 {
char ch2 [] = "Hi2" ;
}
namespace ns_test2 {
char ch3 [] = "Hi3" ;
}
【main.cpp】
#include <iostream>
using namespace std ;
#include "header_test.h"
using namespace ns_test2 ;
int main () {
cout << "Hello! World! \n " << endl ;
cout << ch << endl ;
cout << ns_test1 :: ch2 << endl ;
cout << ch3 << endl ;
return 0 ;
}
2022/9/21 - 使C++語言寫的程式內的中文字可以正常顯示
在 CMD 模式輸入以下指令,支援中文編碼(UTF8)
chcp 65001
./hello.exe
2022/9/14 - 使用Linux 開發環境開發C++
軟體下載:開發環境 (下載密碼:234S3530o3390F )
1. 使用PUTTY 登入Linux伺服器
2. nano hello.c 或者 nano hello.cpp
3. nano 儲存檔案:【ctrl + x】
4. 編制指令:g++ -o hallo hallo.cpp
5. 執行:./hallo
備註:
g++ 可以用來編譯 .c 、 .cpp
gcc 可以用來編譯 .c
2022/9/14 - 建立VSCode 開發環境筆記
軟體下載:開發環境 (下載密碼:234S3530o3390F )
安裝 VSCode
安裝 GCC :
解壓:winlibs-x86_64-posix-seh-gcc-11.2.0-mingw-w64ucrt-10.0.0-r1.7z
設置:【系統變數\ PATH 】 ,增加一個路徑: 【C:\mingw64\bin\】
測試GCC:輸入指令 gcc -v
安裝專案設定檔:
複製:msa111\C++\ftp\vscode-cpp-for-windows-maste\ 中
在【VSCode \ 開啟資料夾】,選擇 【 D:\Litech2\C++\】
備註:
C語言 副檔名: .c
C++語言 副檔名: .cpp
IOT嵌入式系統開發環境設定檔案
關於OpenAPI
OpenAPI路徑:
https://wisdom.nutc.edu.tw/~1711131010/openapi/iot/
IOT嵌入式系統文件適用:
C語言入門
C++語言入門
嵌入式系統
API運用
物聯網架構學習
IOT嵌入式系統參考文獻:
<<劉鎮城教授 >>
<<其他同學作品: 111>>
<<其他學長作品: 110>>
<<Arduino常用函數>>
https://openhome.cc/
https://www.programiz.com/
https://designtech.blogs.auckland.ac.nz/
https://www.mouser.tw/
https://lifeyou.net/2019/07/30/arduino_buzzer/
http://epaper.gotop.com.tw/pdf/AEH001800.pdf
http://marcostudio.nde.tw/
https://ithelp.ithome.com.tw/articles/10271219
https://youyouyou.pixnet.net/blog/
https://thingspeak.com/
https://randomnerdtutorials.com/esp32-microsd-card-arduino/
https://blog.jmaker.com.tw/arduino-sdcard/
https://diyi0t.com/sd-card-arduino-esp8266-esp32/
https://www.chosemaker.com/board/esp32/lesson-9/
http://www.jplopsoft.idv.tw/neocities/php/ito/portlog/